The Anomaly Detection process is used for testing continuous data for a monitor item. The sample data is analysed over time using machine learning to identify unusual patterns and behaviour.
The process evaluates one or more inputs from entity attributes and detects anomalies based on patterns observed in historical data. Instead of comparing data against fixed limits, the process identifies data points that deviate from expected behaviour.
Events
When a new state is reached, an event is raised. The severity for that state is specified in the state configuration panel of the test.
Behaviour
The Anomaly Detection process evaluates time-series data collected for each configured input and identifies anomalies based on learned patterns.
Initial Data Requirement
At least 512 data points per input are required before anomaly detection begins. Until this requirement is met, no anomaly detection occurs and no state or event changes are triggered.
As an example, if the Test is configured with a 1-minute sample interval, the first 512 non-suppressed data points will not produce any anomaly detection results. The process will begin evaluating data only after sufficient data has been collected, using a set of recently collected data that includes previously captured values.
Data Evaluation
Once sufficient data is available, the process evaluates the input data to identify unusual behaviour based on the selected model.
The evaluation results are used to determine the current state of the monitor item and trigger events where applicable.
Detection Accuracy
Initial results may be less reliable due to the smaller dataset.
As more data is collected, the detection accuracy improves and false positives are reduced.
Data Limits
The process enforces an upper limit on the amount of data used for evaluation:
- Maximum 1,000,000 data points across all inputs.
- For multiple inputs, data is distributed across inputs. For example, for 10 inputs specified, a maximum of 100,000 points per input window is used.
Inputs
The Anomaly Detection process allows configuration of multiple inputs.
- Minimum: 1 input
- Maximum: 100 inputs
The primary input is based on the selected Source context, while additional inputs can be configured to supplement the analysis.
Inputs can be defined using attributes, calculations, tags, entity attributes, or fixed values.
Each configured input provides data values that are evaluated by the anomaly detection process.
Machine Learning Model
The Anomaly Detection process uses machine learning to analyse input data. A model can be selected in the Model Settings section in the Process Panel.

Available Models
The following model is supported for the Anomaly Detection process:
- IFS.ai Unsupervised (Low)
This model provides a basic level of anomaly detection.
Note: Only one machine learning model is currently available in this process. Additional models and configuration options are expected to be introduced in future releases.
State Transition Rules
The Anomaly Detection process determines state transitions based on the evaluation of input data. Transition from one state to another is equally dependent on the current evaluation of data, and on the current state.
State transitions cause events to be raised, allowing for the escalation of actions via the Sentinel framework. Different actions can be defined for each state outcome.
In the Anomaly Detection process, the state transitions are based on whether the evaluated data is identified as normal or anomalous.
For example, the Default state can transition to the Anomalous state when unusual behaviour is detected, and can return to the Default state when the data is considered normal again.
Test Outcomes
The following outcomes are possible when the Anomaly Detection process is executed:
| Default State | Data is not in an erroneous state and does not exhibit unusual behaviour. |
| Anomalous State | Data is identified as anomalous based on the model evaluation. |
| Suppressed State | The monitor has been suppressed. For example, if the precondition has not been met. |
Adding an Anomaly Detection Process
Every test uses a specific type of process to evaluate monitor item data. The Anomaly Detection Process is used for testing continuous data using machine learning.
In the Test page:
1. Expand the Process  panel.
The Process panel appears as shown in the following screen image:
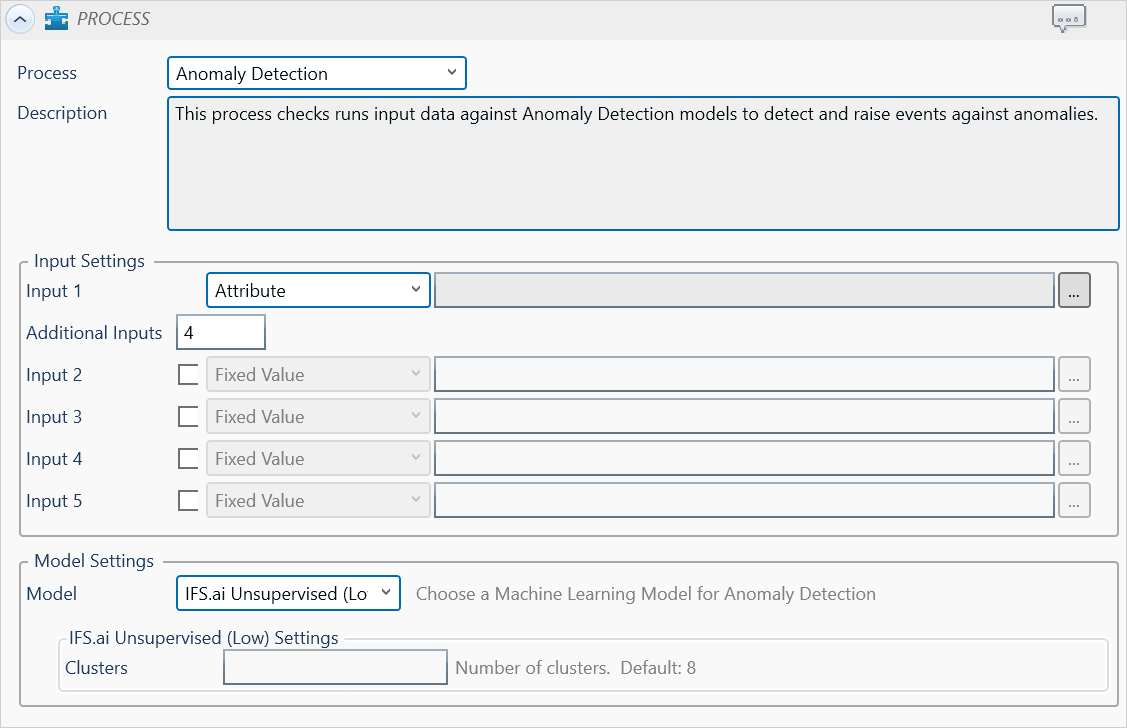
2. In the Process drop-down list, select Anomaly Detection.
3. From the Input drop-down list, select an input.
Each test requires a primary input (Input 1) and allows additional inputs to be configured.
Primary Input (Input 1):
The primary input is derived from the selected Source context. Depending on the Source Type, you can select an attribute or a source tag, or define a calculation based on the monitor items. This input is used as the main data input for the process.
Additional Inputs:
Additional inputs can be configured, up to a maximum of 100 inputs in total. These inputs can be defined using the available input options and are used to supplement the analysis.
Input Types
Attribute: This option is only available if the Source Type is Entity or Hierarchy.
Click the ellipsis  button to select an attribute. You are limited to selecting an attribute of the test source monitor items. This attribute of each of the monitor items is a separate process input.
Source Tag: This option is only available if the Source Type is Tag. If you select this option, then each of the tag monitor items is used as separate process input.
Calculation: Click the ellipsis  button to open the Edit Calculation window.
- If the Source Type is Entity or Hierarchy: Type a calculation, prefixed by ‘this’ as the Source Entity token, for example: {this:THP} + 34.
- If the Source Type is Tag: Type a calculation, prefixed by ‘this’ as the Source Tag token, for example: {this} * 2.
Entity Attribute: Click the ellipsis  button to select an entity. From here, select an attribute, or attribute value, for the selected entity.
Tag: Click the ellipsis  button to select a tag.
Fixed Value: Type in a numerical value. This is not an option for Input 1.
5. To add comments to the process panel, click the comment  button, at the top right of the panel.
Configuring States
For the Anomaly Detection process, you can configure the following states, each with an optional state override and comments:
- Default
- Anomalous
- Suppressed
You cannot change the severity of the Default state; however, you can add a state override and comments.
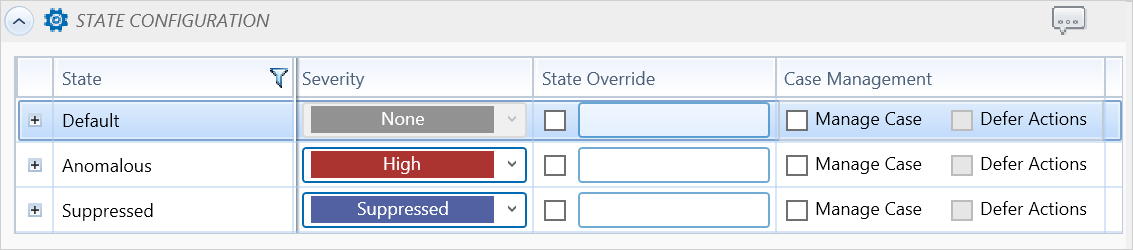
Additional options such as case management actions can be configured for each state.
Release History
- Anomaly Detection Process 26R1 (IFS Cloud Release)